How to use Stream-It
Everything in the Stream-It app, step by step, with screenshots: setting up a production, connecting phone cameras, switching Screens, adding a score or a logo, recording and going live. For Android phones and tablets, and for iPhone and iPad.
Before you start
Stream-It turns phones into a small TV studio. One phone (or tablet) is the production phone: it mixes the cameras, adds your score and logo, and sends the stream. Other phones can be cameras.
What you need
- The Stream-It app on every phone you use: the production phone and each camera phone.
- A Stream-It account. Every part of the app needs you to log in (it is free).
- To go live: a YouTube channel, a Facebook page or profile, an Instagram account, or any server that gives you a stream link and key.
- Wi-Fi or good mobile data. Phones on the same Wi-Fi can work as cameras without internet; going live needs internet on the production phone.
Install the app
- Android phones and tablets: Stream-It on Google Play.
- iPhone and iPad: Stream-It Studio on the App Store.
Everything in this guide works on iPhone and iPad too: going live, other phones as cameras, Screens and overlays. The few small differences are in Android and iPhone.
Words used in the app
| Word | What it means |
|---|---|
| Production | One stream or recording: its cameras, Screens, overlays, sound and platforms. |
| Screen | One ready look for your stream, such as Main (camera with score and logo) or Starting soon. |
| Program | What viewers see right now (marked ON AIR). |
| Preview / Up next | The Screen that goes on air when you tap TAKE LIVE (marked NEXT). |
| Overlay | Anything on top of the camera: a score link, logo, text, sticker, video, ticker. |
| Main camera | The camera that every Screen's "Main camera" shows. Swap it with one tap. |
| Platform | Where viewers watch: YouTube, Facebook, Instagram or another server. |
| READY | The production is open but nothing is sent yet. Nothing goes out until you tap GO LIVE. |
Log in or create an account
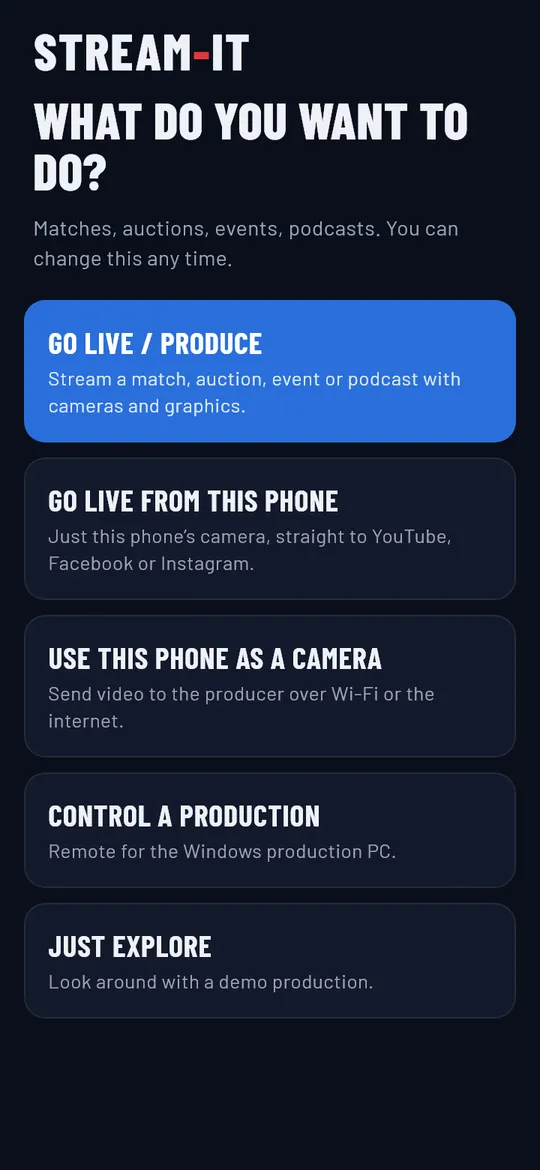
When the app opens for the first time it asks What do you want to do?
- Go live / produce: a production with cameras and graphics. Most people start here.
- Go live from this phone: just this phone's camera, straight to your platforms.
- Use this phone as a camera: send this phone's picture to the production phone.
- Control a production: a remote for the Windows production PC (coming soon).
- Just explore: look around a demo production with sample cameras.
You can change your choice any time. Next, log in:
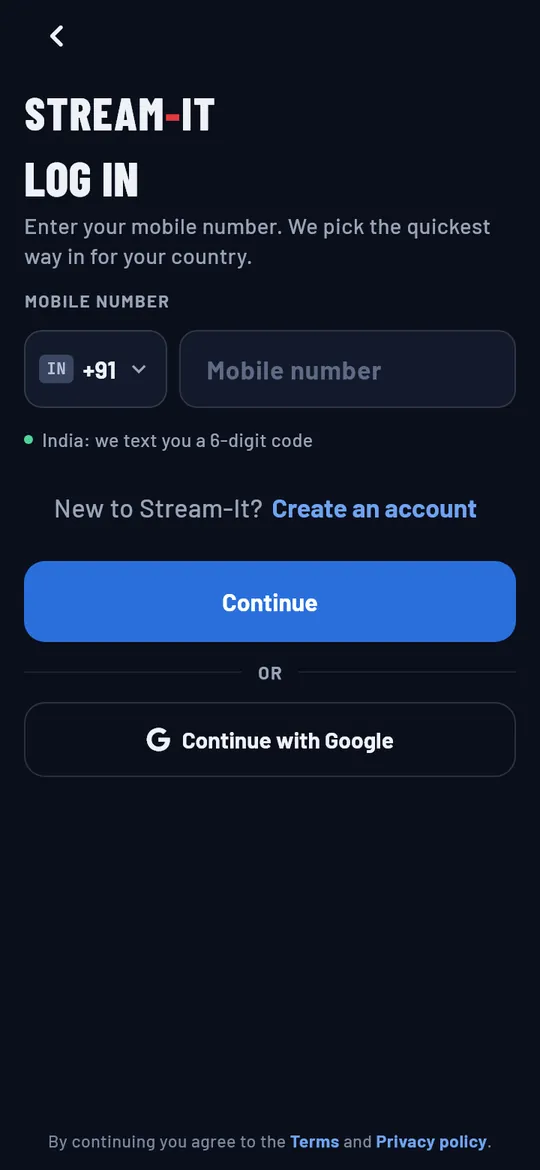
- Pick your country code and type your mobile number, then tap Continue.
- In India (+91) we text you a 6-digit code. In other countries you log in with your password.
- New here? Tap Create an account. Forgot your password? Reset it with a code.
Depending on your country and what is switched on, you may also see Use a login code (emailed to you), Continue with Google, or on iPhone Sign in with Apple. No Google button? It is not switched on for your phone yet: log in with your mobile number.
The Home screen
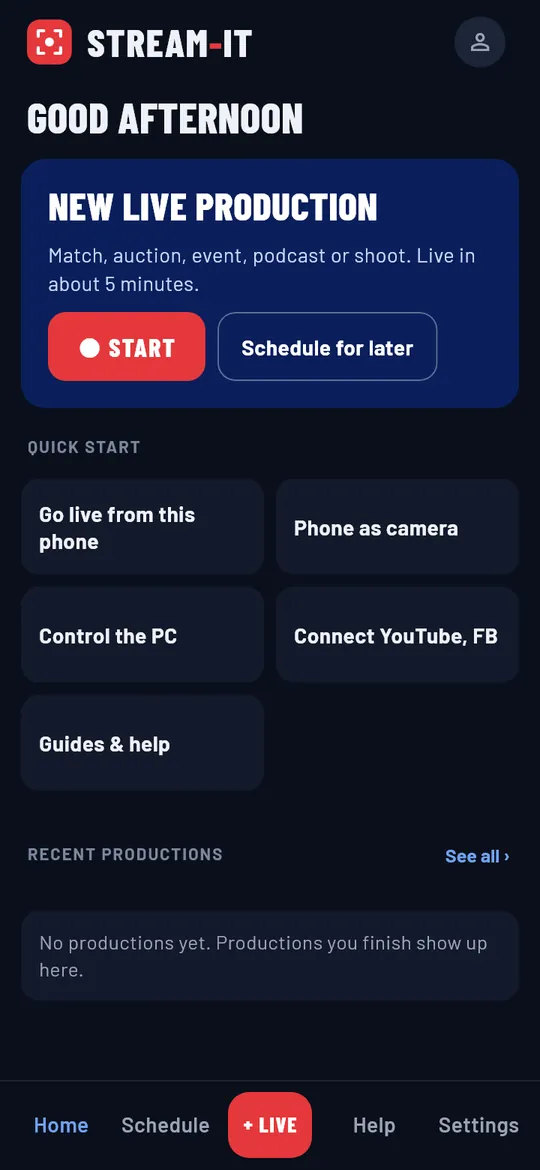
- New live production → START sets up a production in 7 short steps.
- Schedule for later plans a stream for another day (see Schedule).
- Quick start: Go live from this phone, Phone as camera, Control the PC, Connect YouTube / Facebook, Guides & help.
- Recent productions: your finished productions. Open one to see what happened, or to go live again with the same setup.
- The round button at the top right opens My account.
The bar at the bottom moves between Home, Schedule, + LIVE (a new production), Help and Settings.
A production you left open shows at the top of Home as READY with Open ›. It also comes back after the app closes, in READY, never live by itself.
Set up a production
Tap START on Home. Setup has 7 steps; ‹ Back goes to the step before, and nothing is sent until you go live.
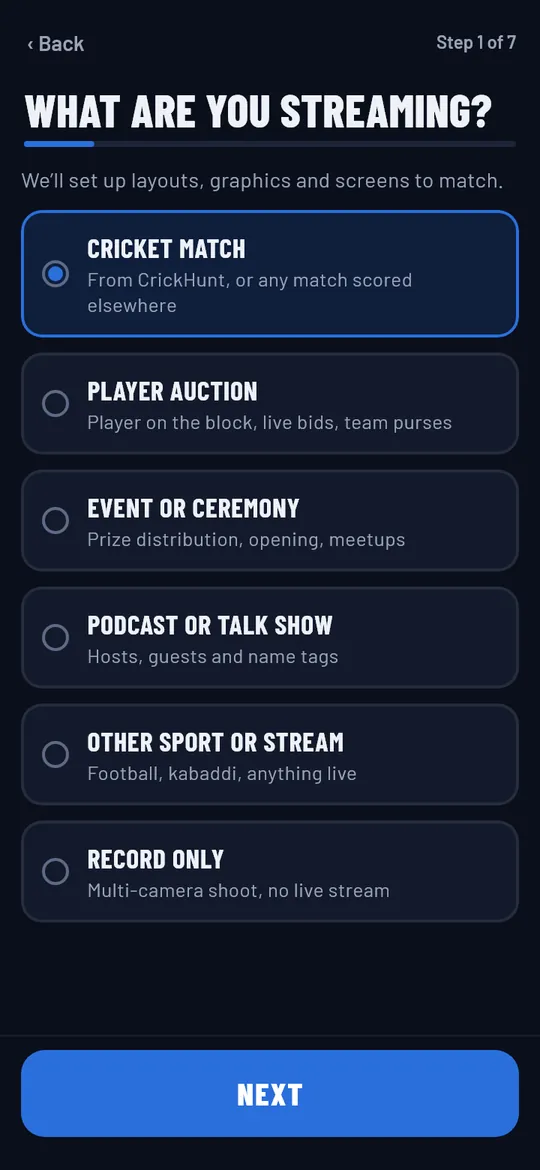
Step 1 · What are you streaming?
Pick Cricket match, Player auction, Event or ceremony, Podcast or talk show, Other sport or stream, or Record only (a multi-camera shoot with no live stream). Stream-It sets up the layouts, graphics and Screens to match.
Step 2 · Details
Type a Title (you can change it later), and if you like the host or organiser and a thumbnail / poster.
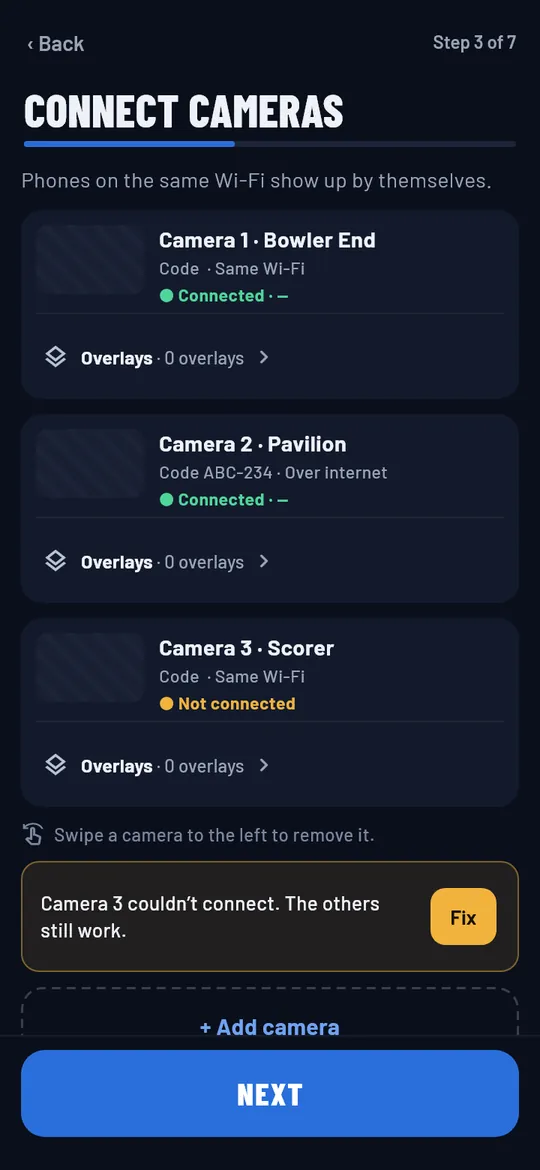
Step 3 · Connect cameras
Phones on the same Wi-Fi that are open in Use this phone as a camera show up by themselves. Everything about cameras is in Connect cameras. You can skip this step and add cameras later.
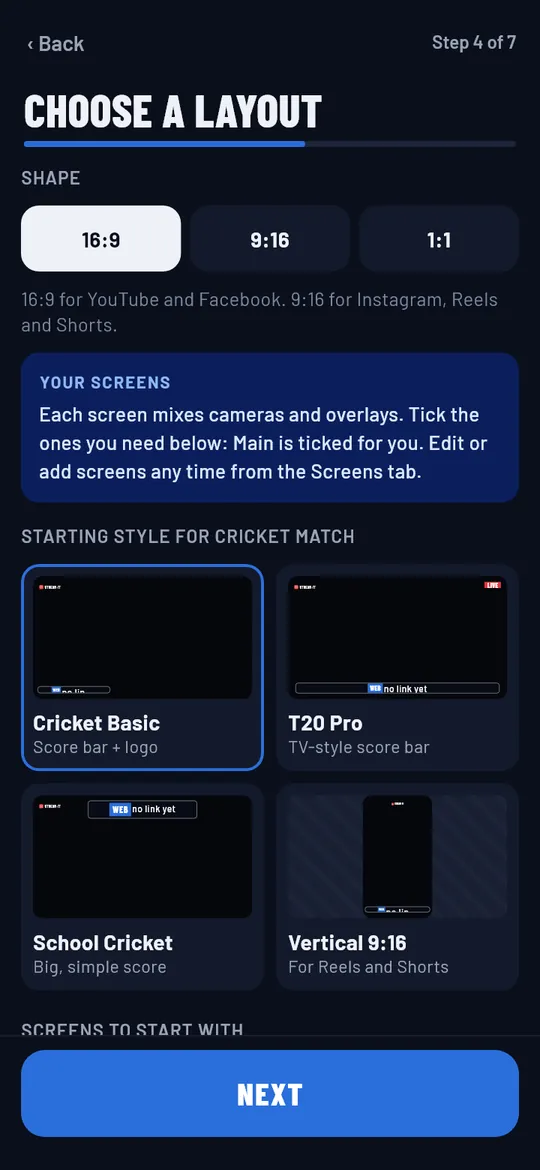
Step 4 · Choose a layout
- Shape: 16:9 for YouTube and Facebook; 9:16 for Instagram, Reels and Shorts; 1:1 square.
- Starting style: how your overlays look, for example Cricket Basic (score bar and logo) or T20 Pro. Picking a style re-dresses your Screens.
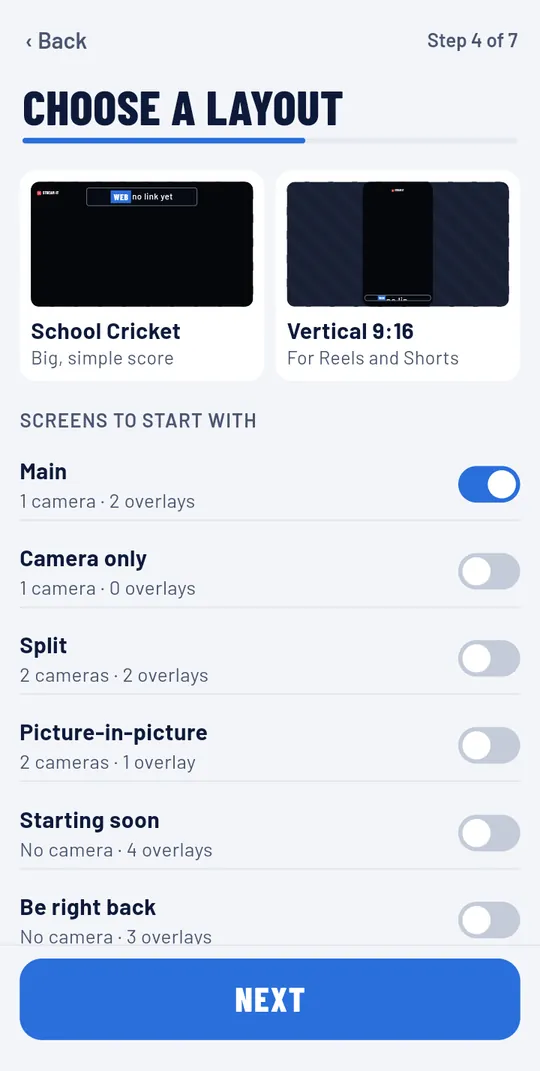
- Screens to start with: tick the ready-made Screens you want. Main is ticked for you; add Camera only, Split, Picture-in-picture, Starting soon, Be right back or Ended. Only the Screens you tick are added. At least one stays.
Need more later? In the control room, Screens → + New screen → Ready-made adds the ones you did not tick.
Step 5 · Choose audio
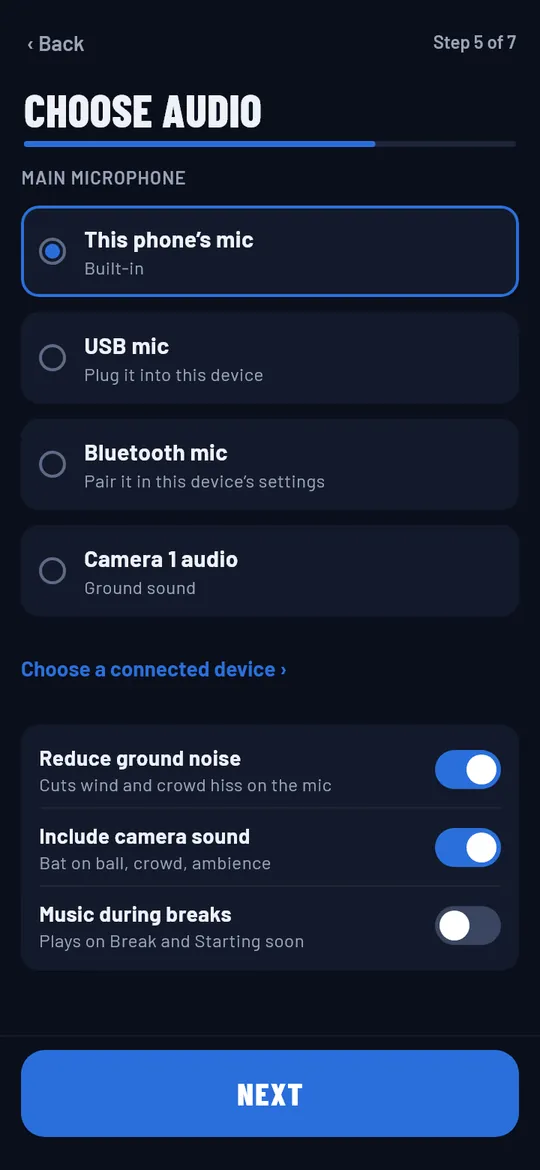
Pick the main microphone: this phone's mic, a USB mic, a Bluetooth mic or a camera's sound. Then choose:
- Reduce ground noise: cuts wind and crowd hiss on the mic.
- Include camera sound: bat on ball, crowd, ambience.
- Music during breaks: plays on Starting soon and Be right back.
Step 6 · Where to stream
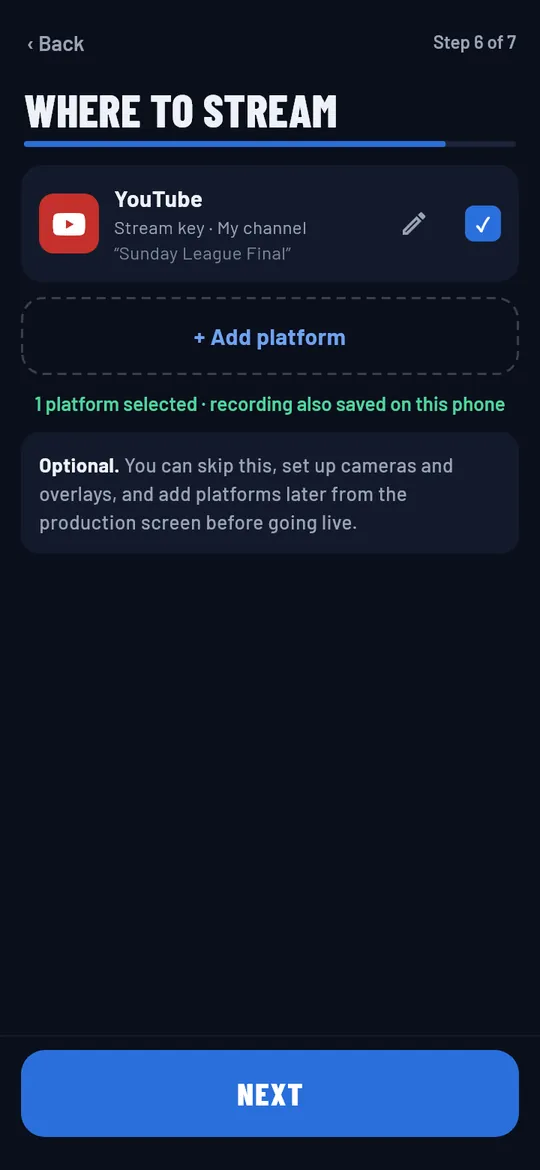
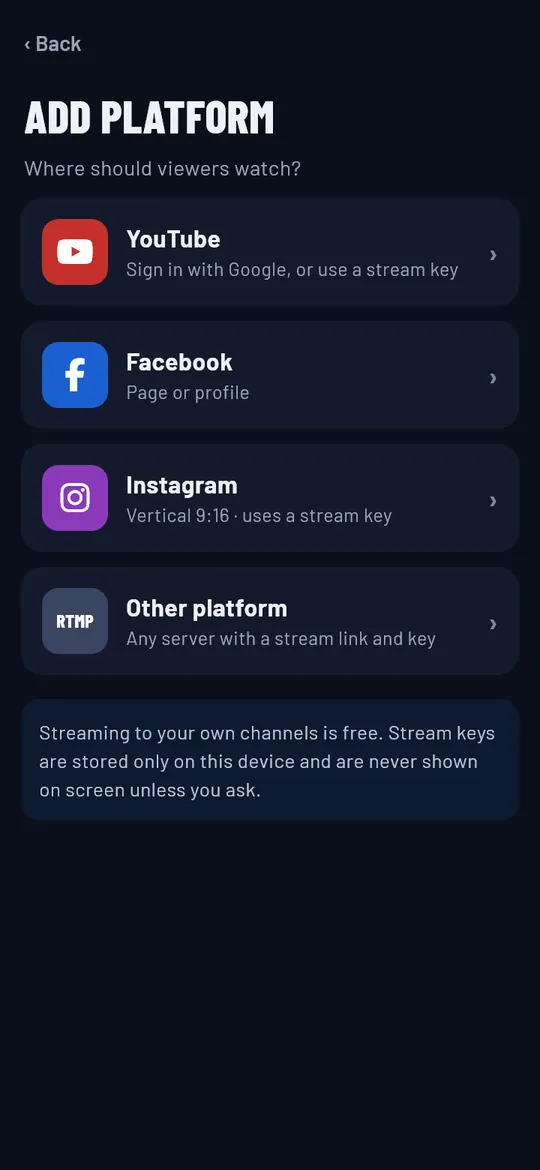
Tick the platforms for this production, or tap + Add platform: YouTube, Facebook, Instagram (vertical 9:16) or Other platform (any server with a stream link and key). This step is optional: Skip for now and add platforms later.
To connect YouTube: choose YouTube, then Use server URL and stream key. In YouTube Studio open Create → Go live → Stream, copy the Stream key and paste it into Stream-It, then tap Save platform. Sign in with Google is coming soon.
Stream keys stay only on your phone and are hidden unless you tap Show. Never share them. Streaming to your own channels is free.
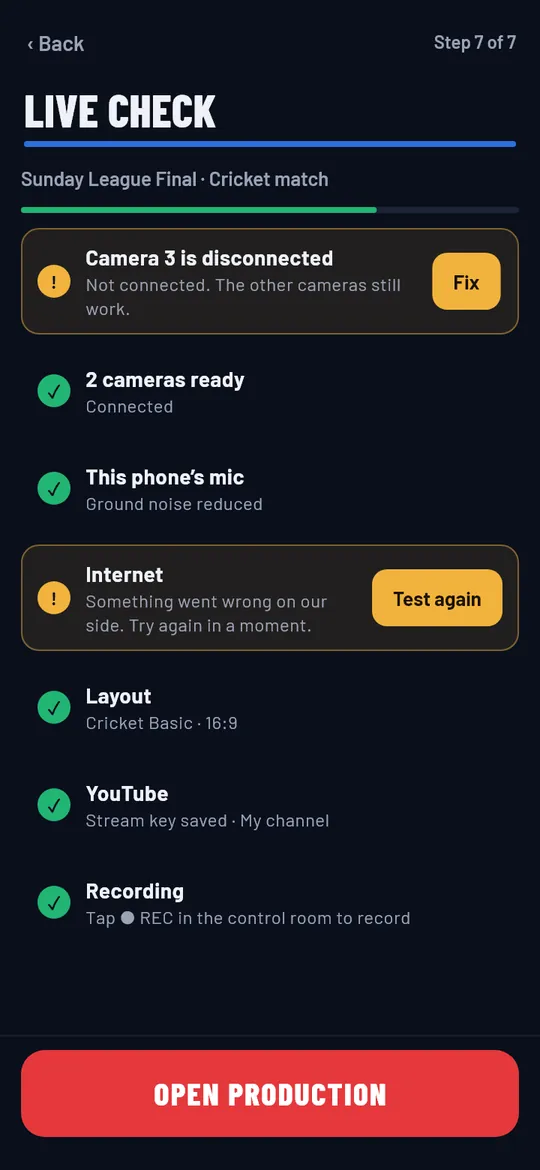
Step 7 · Live check
Stream-It checks your cameras, microphone, internet, layout, platforms and storage for recording. Anything that needs you shows in yellow with a Fix or Test again button. One camera that fails never stops the others.
Tap OPEN PRODUCTION. You are now READY · NOT LIVE: the control room is open and nothing is sent yet.
Connect cameras
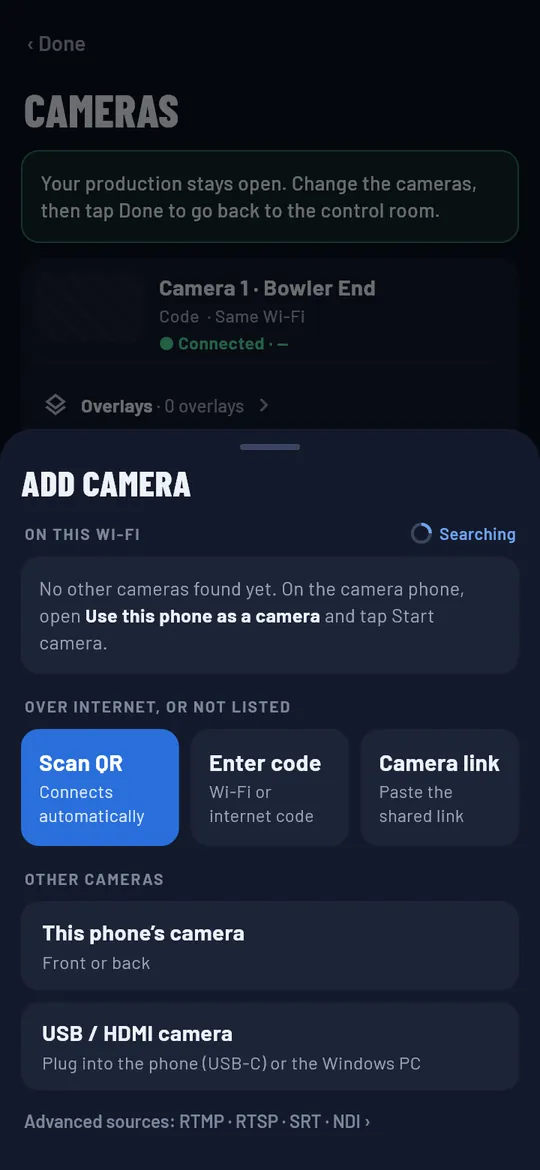
Open Connect cameras in setup, or Manage cameras in the control room. Tap + Add camera:
- On this Wi-Fi: camera phones on the same Wi-Fi are listed. Tap one to add it.
- Scan QR: scan the QR code on the camera phone.
- Enter code: type the code shown on the camera phone. 6 digits = same Wi-Fi, no internet needed; ABC-123 = over the internet, from anywhere.
- Camera link: paste a link the camera phone shared with you.
- This phone's camera: the production phone's own front or back camera.
- USB / HDMI camera: a camera plugged into the phone's USB-C port.
The camera phone then taps Allow to finish. Each camera shows Connected (green) or Not connected (yellow). Swipe a camera to the left to remove it. Each camera can also have its own overlays.
Use a phone as a camera
Any spare Android phone or iPhone can be a camera. On the camera phone:
- Open Stream-It and tap Phone as camera on Home (or Use this phone as a camera on the first screen).
- Allow the camera, and the microphone and nearby devices when asked.
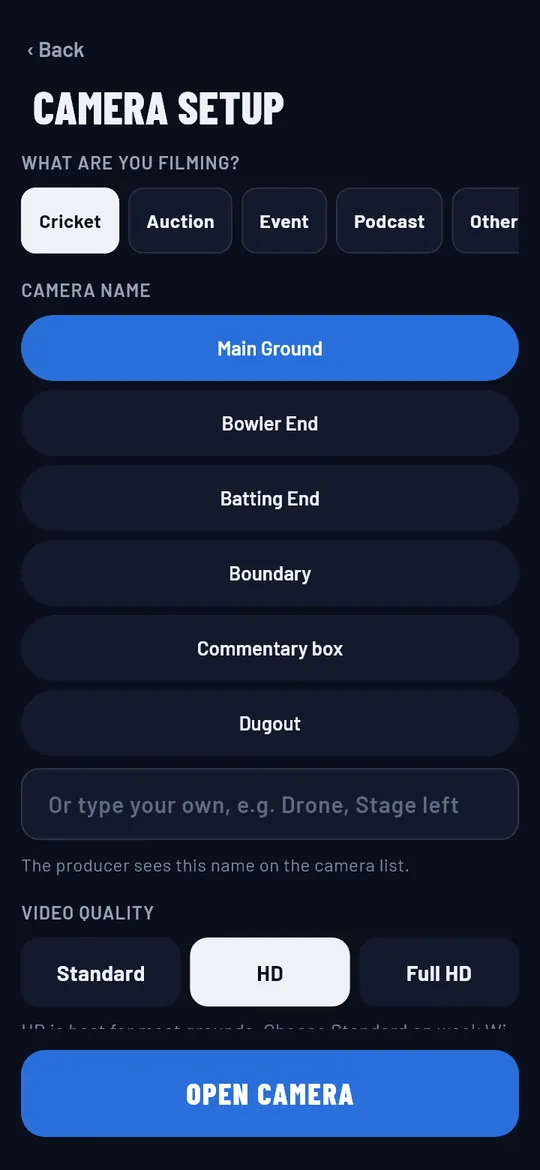
- Pick what you are filming, a camera name (the producer sees it, e.g. Bowler End) and the video quality. Tap OPEN CAMERA.
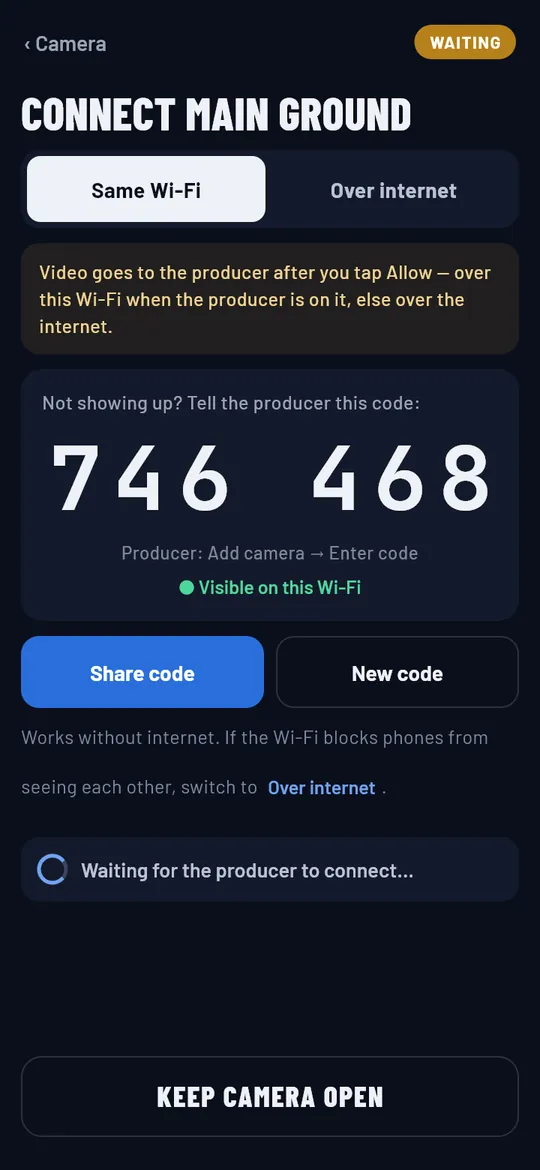
- Choose Same Wi-Fi or Over internet. The phone shows a QR code and a camera code.
- On the production phone: + Add camera → Scan QR or Enter code.
- On the camera phone, tap ALLOW when the request appears.
- Same Wi-Fi works without internet. If the Wi-Fi blocks phones from seeing each other (common on public and hotel Wi-Fi), use Over internet.
- Shared the code with the wrong person? Tap New code: the old one stops working.
- Keep the camera phone on charge for long matches; Stream-It warns you when its battery is low or it gets hot.
The control room
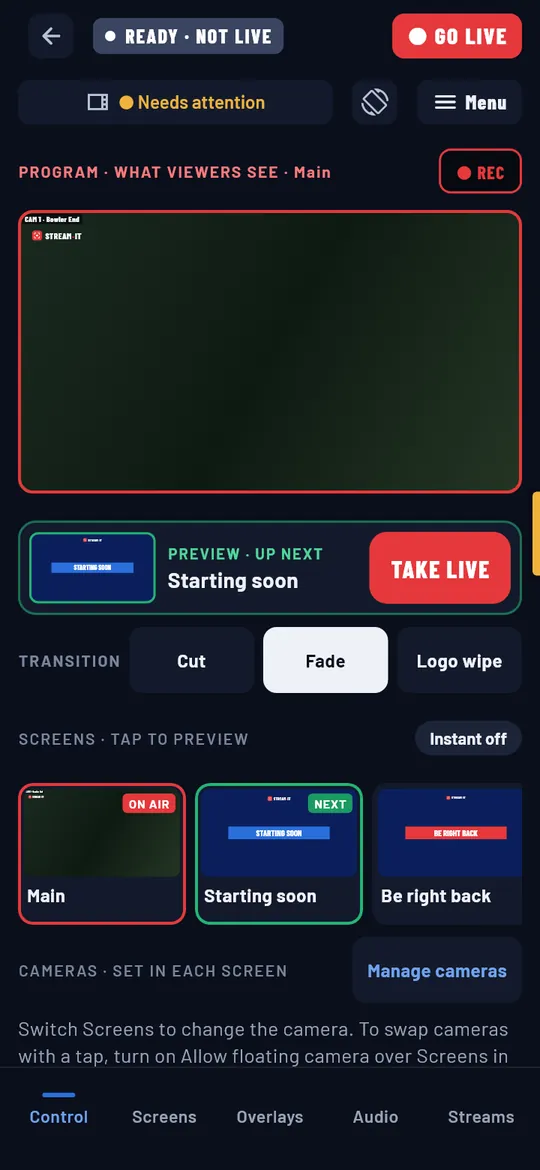
This is where you run the show. From the top:
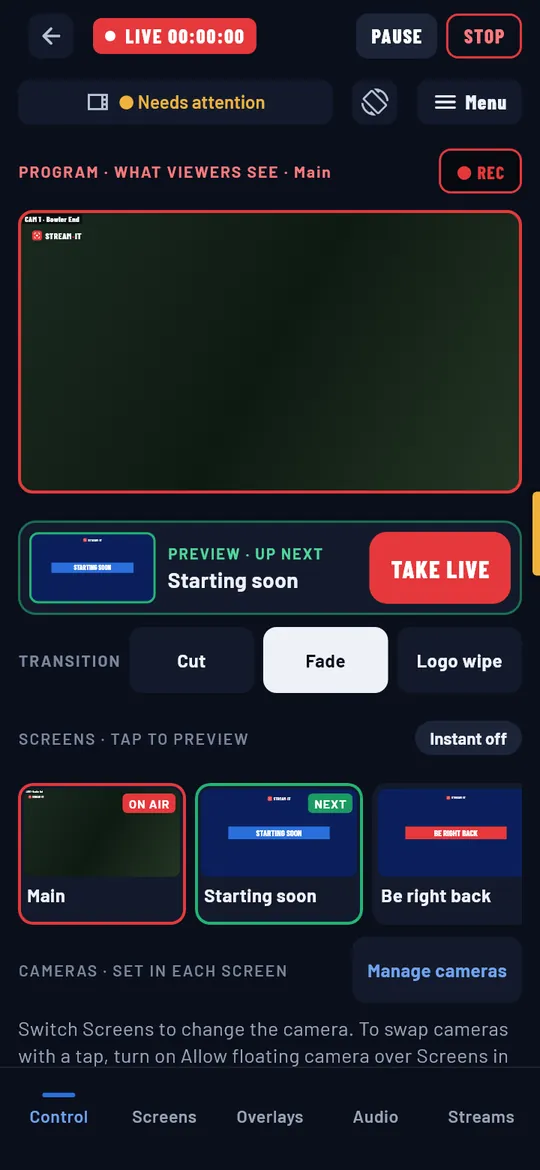
- READY · NOT LIVE / ● LIVE and the time on air. GO LIVE, and while live PAUSE and STOP.
- The health bar (for example Needs attention): tap it, or swipe left from the right edge, for Status.
- Rotate turns the control room sideways; Menu has the production's other options.
- PROGRAM · WHAT VIEWERS SEE, with ● REC to record.
- PREVIEW · UP NEXT and TAKE LIVE.
- Transition: Cut, Fade or Logo wipe.
- Screens · tap to preview and the cameras.
The tabs at the bottom: Control, Screens, Overlays, Audio, Streams.
Switch what viewers see
- Tap a Screen. It becomes NEXT in Preview; viewers see nothing new yet.
- Tap TAKE LIVE. It goes on air with the transition you picked.
Prefer one tap? Turn Instant on: a tapped Screen goes on air at once.
Swap the Main camera with the camera buttons: every Screen that shows the Main camera follows, and the Screen stays the same.
Status
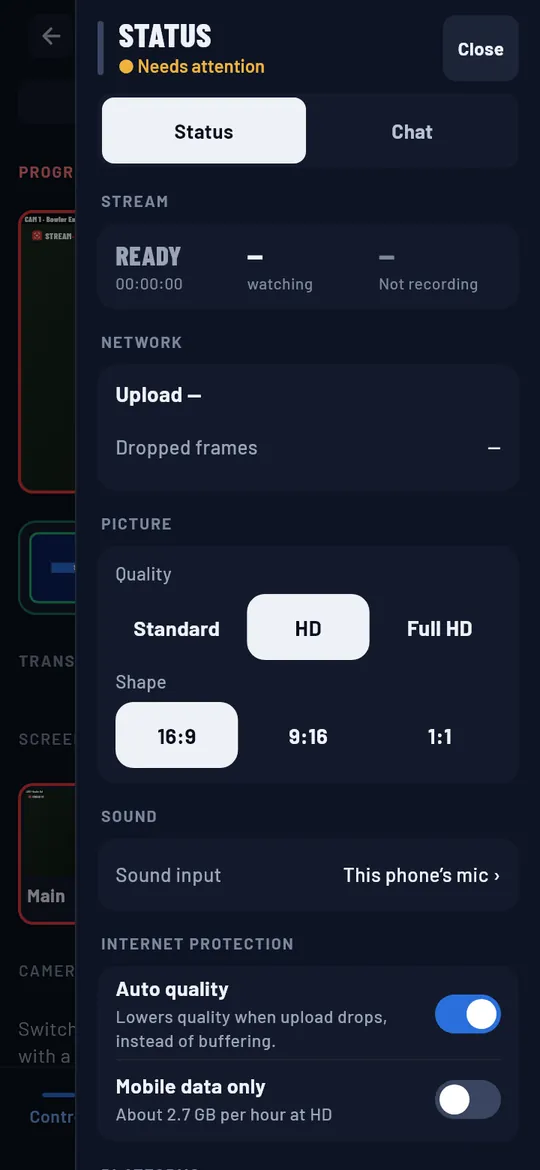
Swipe left (or tap the health bar) for Status: the stream's state and viewers, your upload speed and dropped frames, picture quality (Standard, HD, Full HD) and shape, the sound input, and Internet protection:
- Auto quality lowers the quality when the upload drops, instead of buffering. Keep it on.
- Mobile data only streams over mobile data, and shows how much data an hour uses.
The Chat tab sits next to Status.
Screens
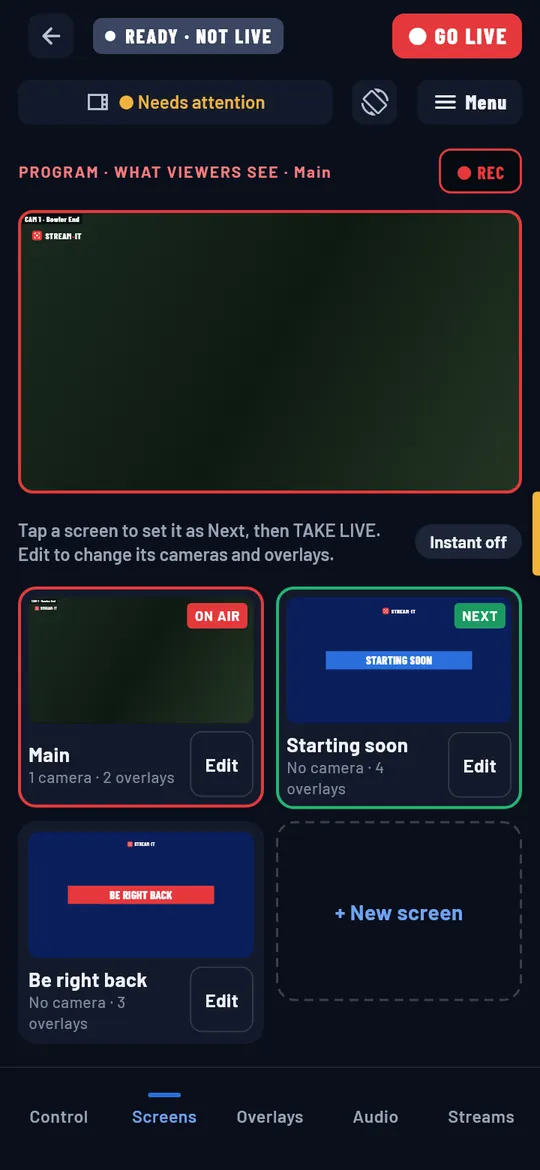
A Screen is one ready look: cameras, overlays and its own sound. The Screens tab shows them all with ON AIR and NEXT.
- Tap a Screen to set it as Next, then TAKE LIVE.
- Tap Edit to change its cameras, overlays and sound.
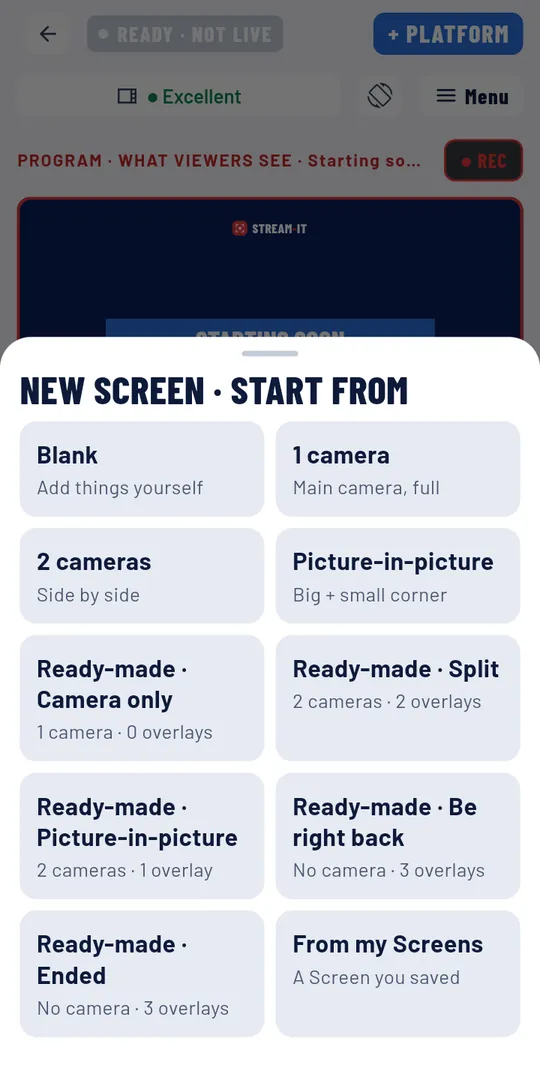
- Tap + New screen to start from Blank, 1 camera, 2 cameras, Picture-in-picture, a Ready-made Screen you did not tick in setup (for example Ready-made · Ended), or From my Screens (a Screen you saved).
- In the editor you can rename a Screen, Set as next, duplicate or delete it, and set Then switch to: e.g. Starting soon switches to Main after one minute by itself.
- Save to my Screens keeps a Screen in your account for every production.
Overlays
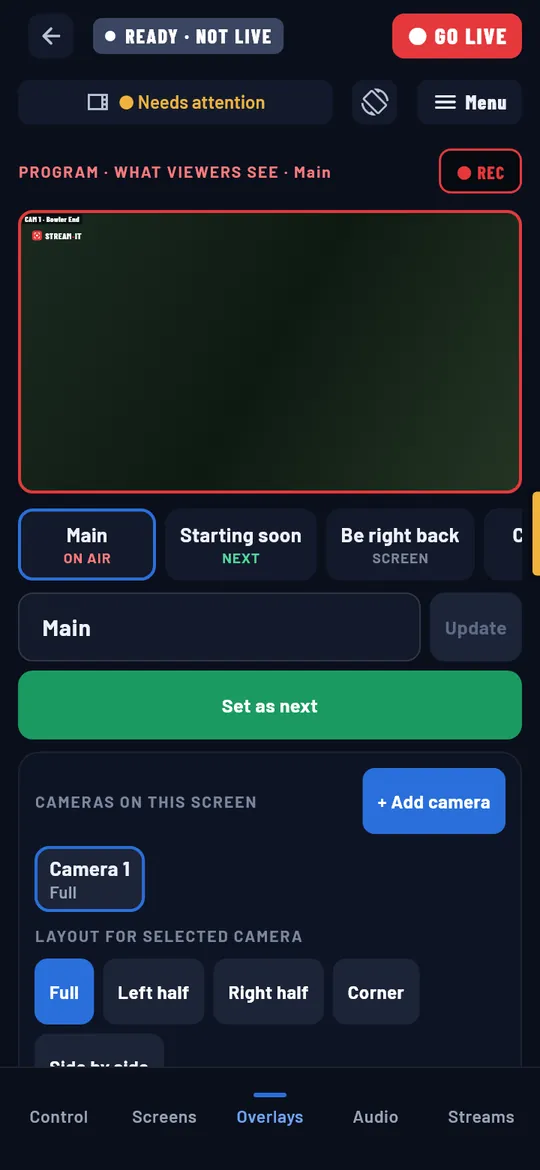
Open the Overlays tab, pick a Screen at the top, and tap + Add overlay:
- Camera · full or Camera · small (picture-in-picture).
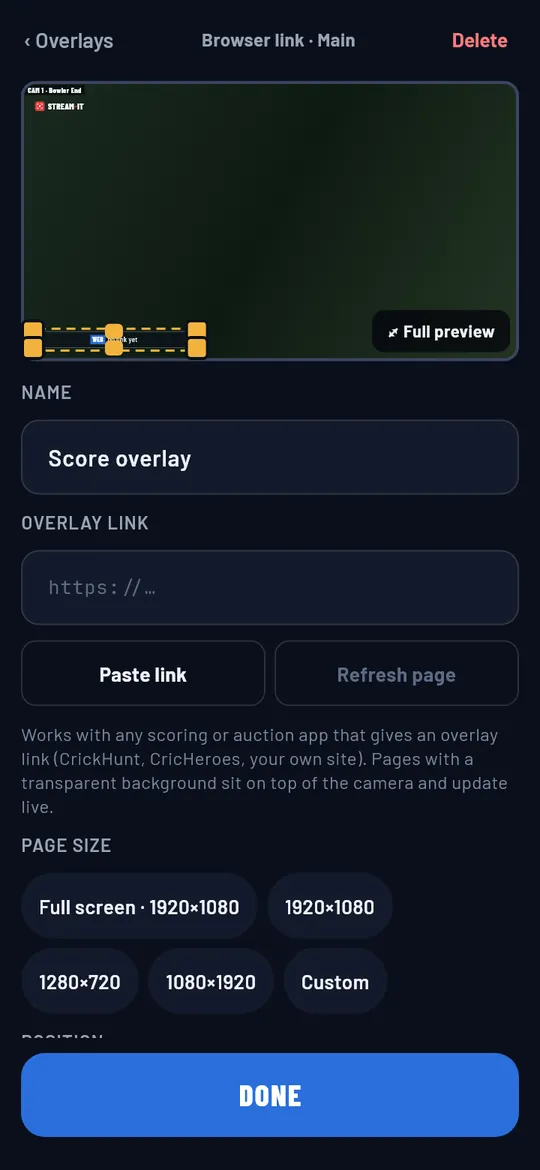
- Browser link: paste the overlay link from your scoring or auction app (CrickHunt, CricHeroes, your own site). Pages with a transparent background sit on top of the camera and update live.
- Image (logo, poster), Video (intro, ad, loop), Sticker (SIX!, OUT!, SOLD!), Text.
- Logo slider: sponsor logos that change every few seconds. Ticker: scrolling lines of text.
- Use an existing overlay from another Screen, or one from My overlays.
The eye shows or hides an overlay; drag the rows to put one in front of another.
Move and resize an overlay
- Move: drag the overlay on the preview, or pick a quick spot (corners, edges, centre).
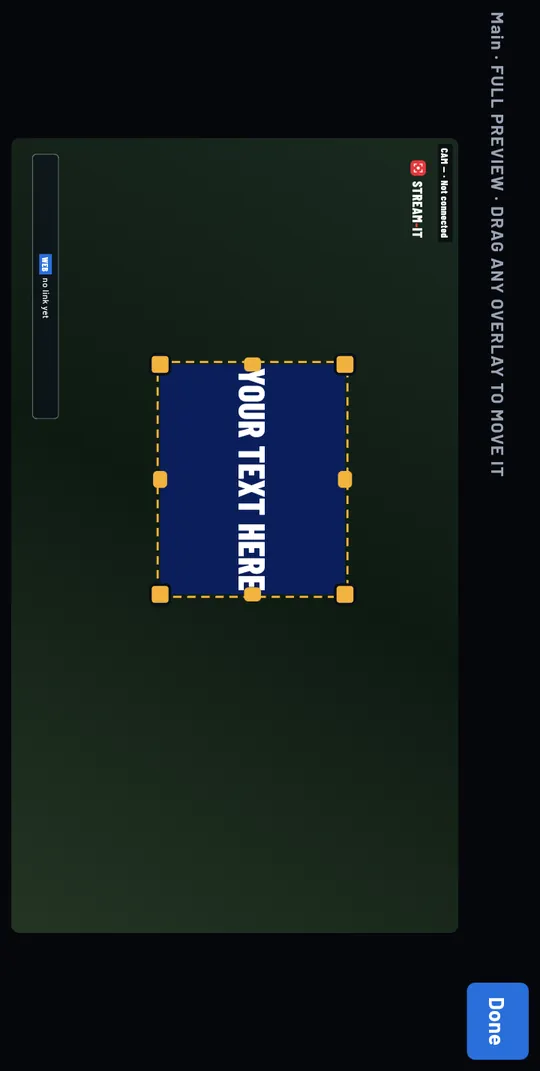
- Resize: drag one of the 8 yellow handles. An edge changes only that side (wider or taller); a corner changes both. Two fingers anywhere on the preview also resize it.
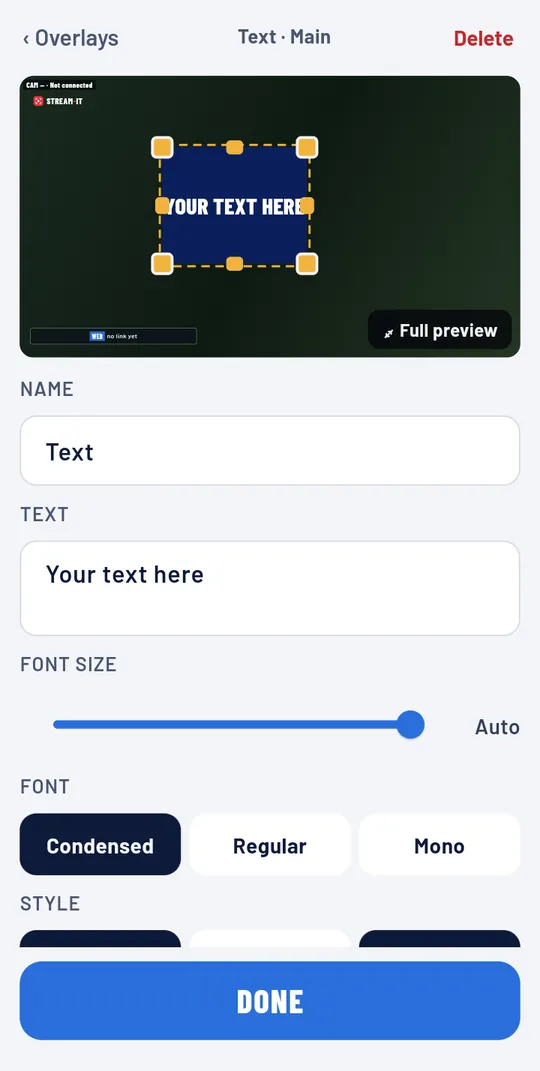
- The W/H lock keeps an image's shape. Text always resizes freely, so a text box can be made wider, taller or both.
- Small overlay hard to grab? Tap ⤢ Full preview: the picture fills the screen, with the same handles.
- Exact sizes: type the width and height in pixels under Size.
Text overlays
Type your text, then pick the font size (or Auto, which fills the box and shrinks to fit), the font (Condensed, Regular, Mono), Bold, Italic, CAPS, the colour and the background.
My overlays and My Screens
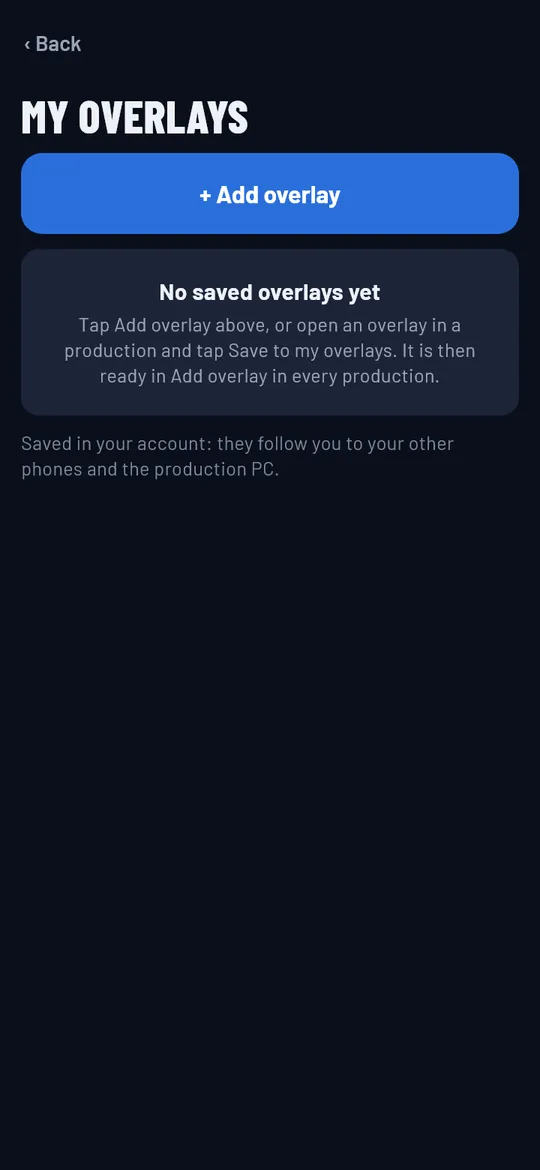
Open an overlay and tap Save to my overlays, or a Screen and tap Save to my Screens. They are kept in your account and follow you to your other phones and the production PC, ready in Add overlay and New screen in every production. Find them under My account.
Sound
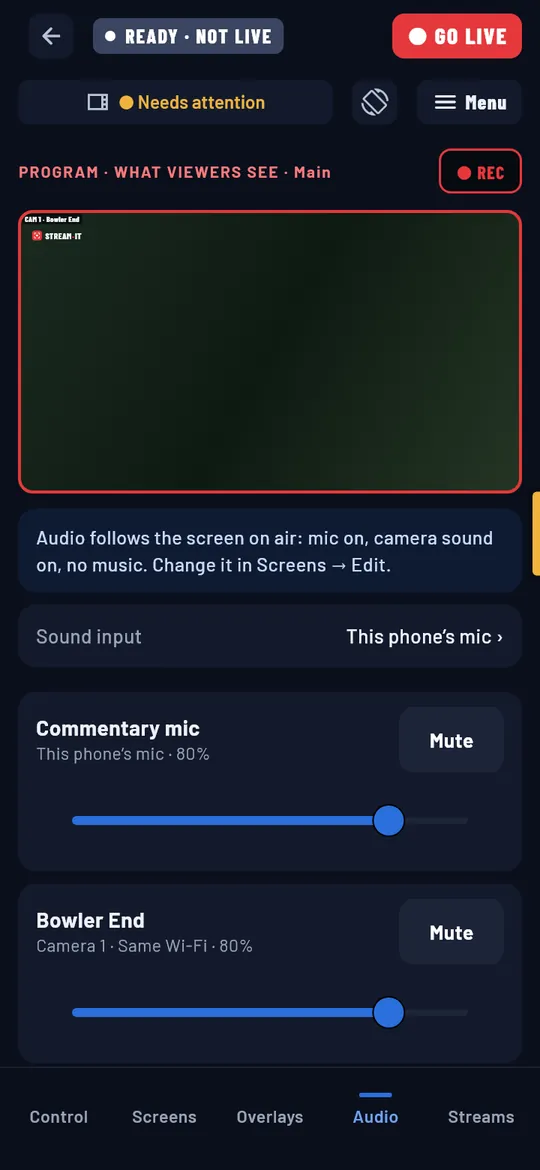
Sound follows the Screen on air: each Screen decides whether the commentary mic, the camera sound and break music are on. Change it in Screens → Edit → Audio on this screen.
The Audio tab shows each input (the commentary mic and every camera) with Mute and a volume slider. Sound input changes the microphone, for example to a USB or Bluetooth mic.
Break music: choose a music file (MP3, AAC, M4A or WAV). It plays on repeat while a Screen with Break music is on air. Use only music you have the right to stream.
Go live, record and finish
Go live
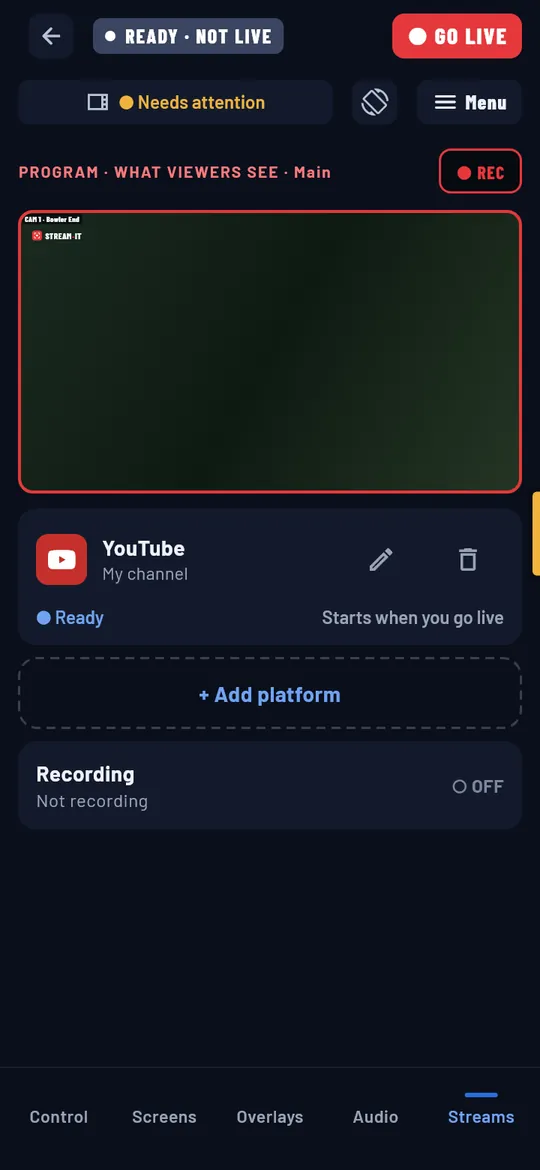
- Check your platforms in the Streams tab. Each one says Ready and "Starts when you go live". Add or edit platforms here too.
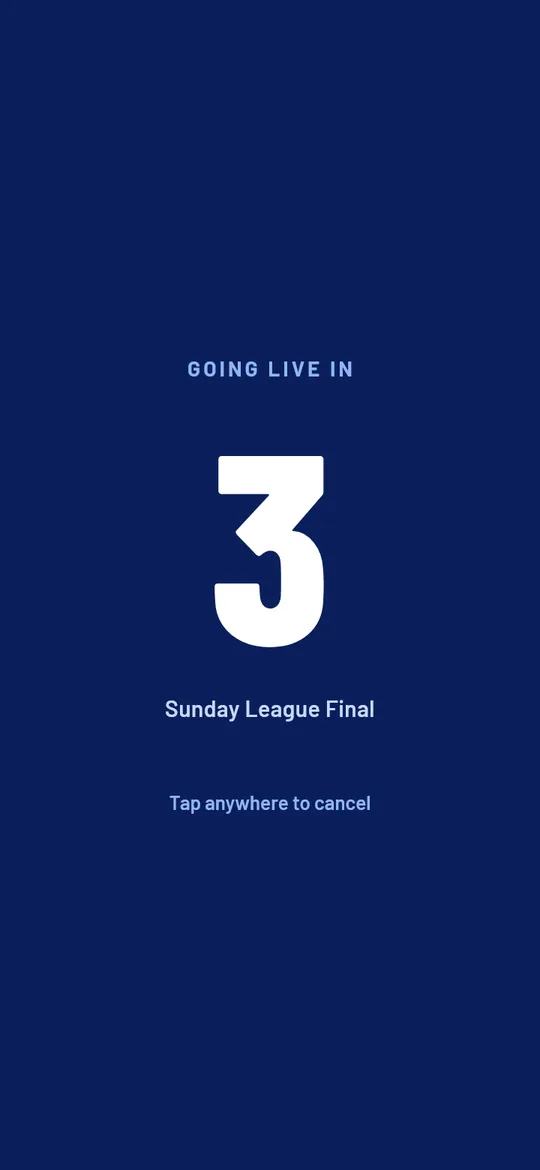
- Tap ● GO LIVE. A 3-2-1 countdown starts; tap anywhere to cancel it.
- You are ● LIVE. One platform that fails never stops the others, and Stream-It reconnects by itself when the internet comes back.
- Watch the platform cards under the top bar: they tell you when YouTube, Facebook or Instagram shows your live to viewers (see below).
Record
Tap ● REC to record what viewers see, live or not. On Android the recording is saved in Gallery › Movies › Stream-It; on iPhone in the Stream-It album in Photos. A recording cut off when the app closed is saved too.
Pause and stop
PAUSE holds the stream; STOP, then End stream, finishes it. The recording is saved, the cameras disconnect and the summary opens. Before going live, Back to setup is in the Status panel (swipe left) under Production; after a live, Close production is there too.
Is it live for viewers? The platform cards
Going live in Stream-It sends your video; some platforms still need you to approve it. A card under the top bar shows each platform:
- Connecting: the platform is getting the stream. Wait a few seconds.
- Approve this stream: open YouTube Studio (or Facebook / Instagram) with the button on the card and start the broadcast there. YouTube does this when auto start is off for the stream.
- Waiting: you opened the platform; the card updates by itself when you come back.
- Approved · you're live there: viewers see you. The card hides itself.
- Can't show this live: the platform refused (for example a wrong stream key, or live streaming not yet turned on for the channel). Get help opens the platform's help.
Added a platform with a stream key? Stream-It can't see inside that platform, so after 20 seconds the card asks you to check it: Not live for viewers yet? Check YouTube Studio. Tap ✕ to hide a card.
Leave the live screen without stopping
Tap ⌄ at the top left of the live screen (or your phone's Back) to minimise it. The live and the recording keep going and you go to Home. A small mini window shows the live picture on every other screen: drag it to a corner, tap Pause on it, or tap it to return to the same tab. A red dot on it means a platform needs you.
Android: while live, pressing the phone's Home button shows the stream in a small floating window (picture-in-picture), and the Stream-It is live notification brings you back to the live screen.
Use the mini window inside the app. Keep Stream-It open while live: iPhone stops the camera when another app is in front.
After the stream
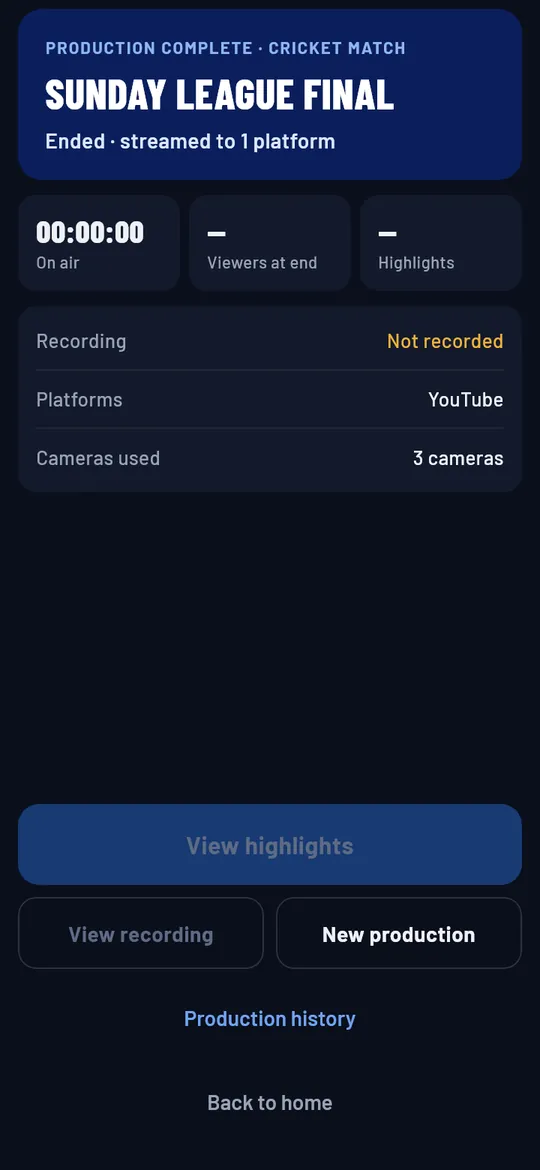
The summary shows the time on air, the recording, the platforms and the cameras used, with View recording and New production. Every production is kept in Production history (Home → Recent productions → See all), where you can open it again or go live again with the same setup.
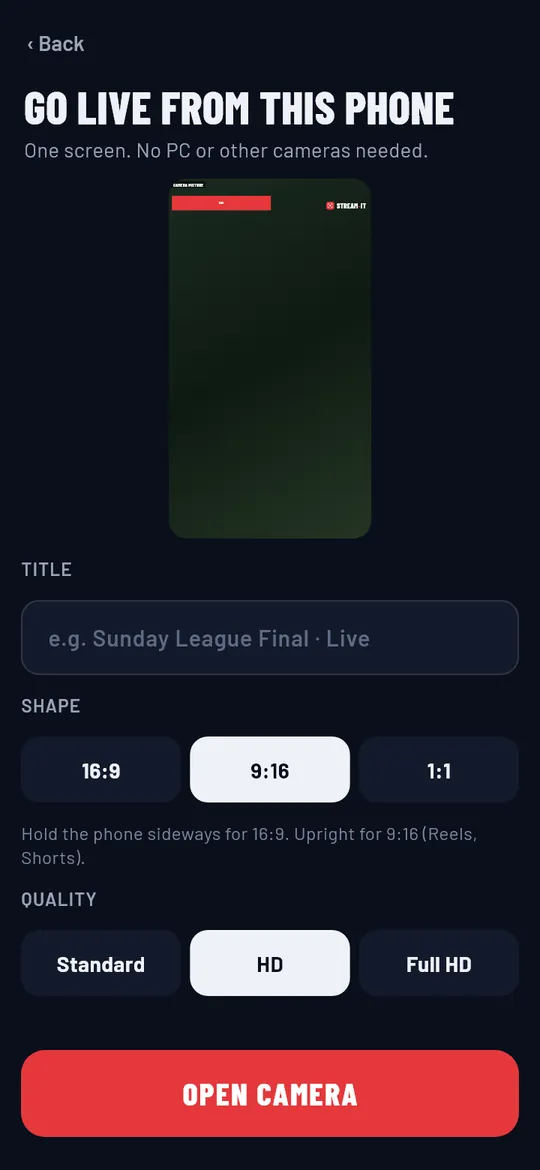
Go live from this phone
Only one camera? Go live from this phone on Home is the quickest way: no setup steps, no other phones.
- Type a title, pick the shape (hold the phone sideways for 16:9, upright for 9:16 Reels and Shorts) and the quality, and tick where to stream.
- Tap OPEN CAMERA.
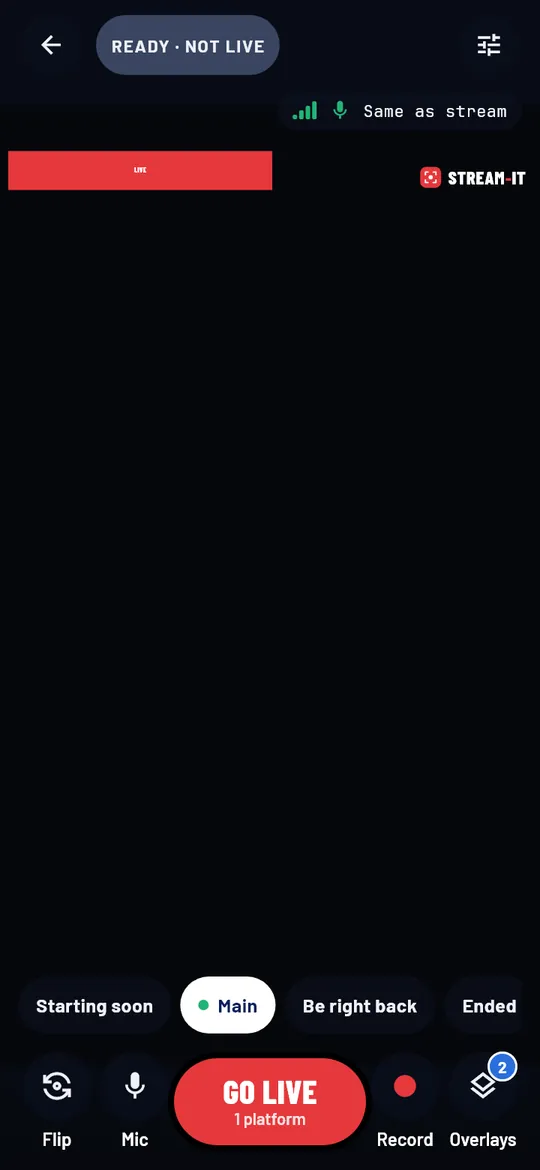
- Along the bottom: Flip (front / back camera), Mic, GO LIVE, Record and Overlays. Tap a Screen above them (Starting soon, Main, Be right back, Ended) to change what viewers see.
- Need another app while live? Tap ⌄ at the top left: the live goes on in the mini window (see Leave the live screen).
Schedule a stream
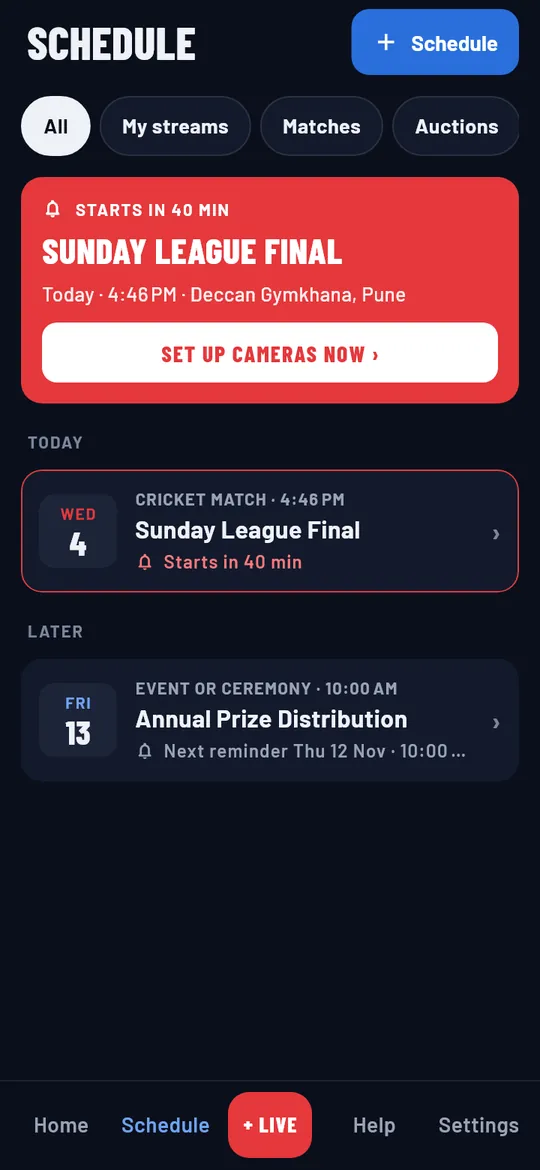
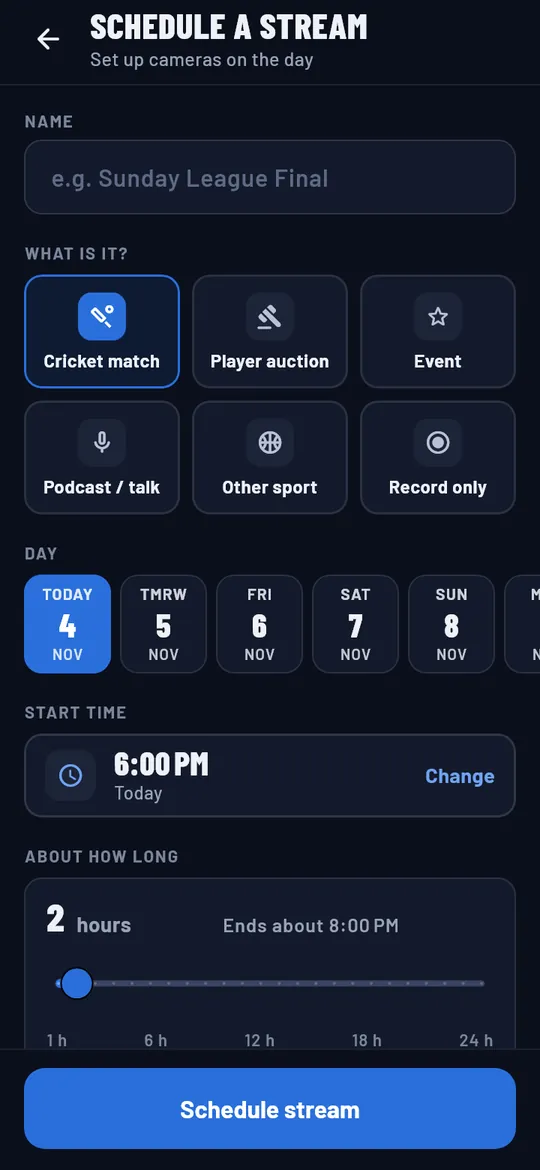
Plan streams ahead, with or without a scoring app. Tap Schedule in the bottom bar, then + Schedule:
- Type a name and pick what it is (cricket match, auction, event…).
- Pick the day, the start time and about how long it runs.
- Choose where to stream and your reminders, then tap Schedule stream.
Your streams are listed by Today, Tomorrow, This week and Later. When one starts soon, Home and Schedule show it with Set up cameras now ›, which opens setup with its details filled in.
Settings and your account
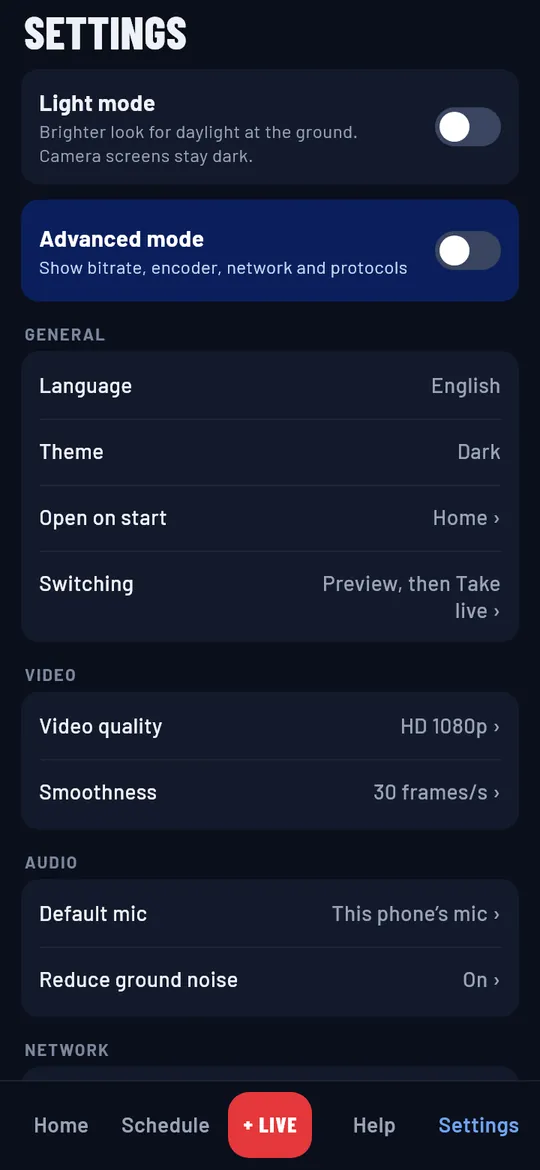
- Light mode: a brighter look for daylight at the ground. Camera screens stay dark.
- Advanced mode: shows bitrate, encoder, network and protocols.
- Open on start, Switching (Preview then Take live, or one tap), Video quality, Smoothness (frames per second).
- Default mic, Reduce ground noise, network and recording defaults: each new production starts with them.
- Report a problem opens an email to us with your app version and a short log you can read first.
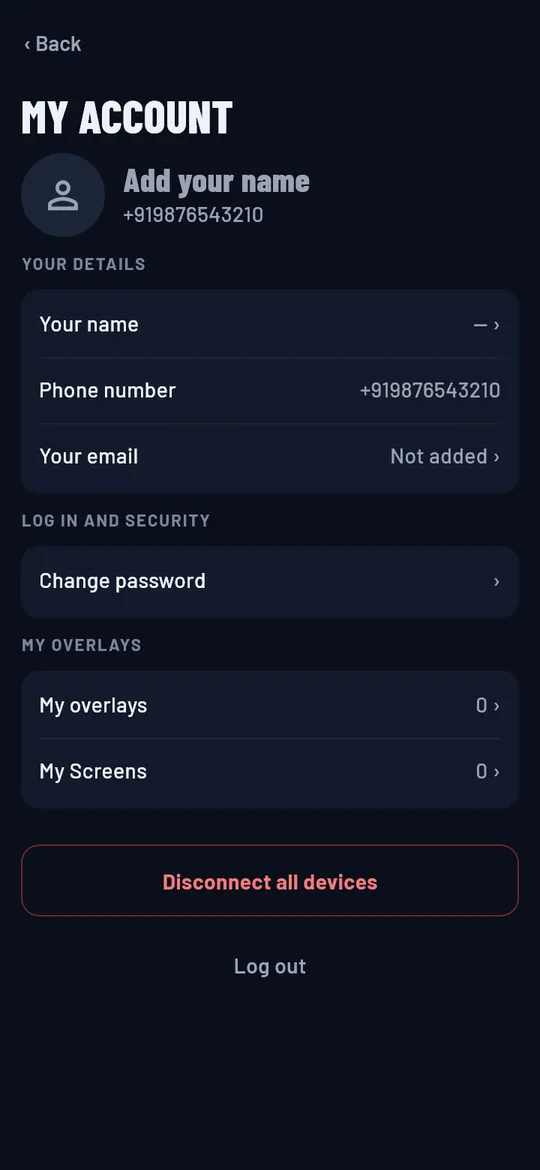
My account (the round button on Home): your name, number and email, change password, log out, My overlays and My Screens. To delete your account and data, see Delete your account.
Android and iPhone: what is different
The app looks and works the same on both. These are the only differences.
| Feature | Android phones and tablets | iPhone and iPad |
|---|---|---|
| Log in | Mobile number (code in India, password elsewhere), login code by email, Google when offered | The same, plus Sign in with Apple |
| Record with this phone's camera | Yes · Gallery › Movies › Stream-It | Yes · Photos › Stream-It album |
| Go live to YouTube, Facebook, Instagram, other servers | Yes | Yes |
| "Go live from this phone" | Yes | Yes |
| Production with other phones as cameras | Yes (same Wi-Fi or over the internet) | Yes (same Wi-Fi or over the internet) |
| Screens and overlays in the video | Yes | Yes |
| Leave the live screen while live | Mini window in the app, picture-in-picture with the Home button, the live notification brings you back | Mini window in the app (keep Stream-It open while live) |
| Platform cards after going live | Yes | Yes |
| Schedule, My overlays, My Screens, Settings | Yes | Yes |
| Permissions | Camera, microphone, nearby devices (to find camera phones on the Wi-Fi) and notifications | Camera, microphone, local network (to find camera phones on the Wi-Fi), Photos (to save recordings) and notifications |
A Windows production desk is on the way. Using a phone as a remote for the PC (Control a production) is coming soon.
Troubleshooting
The app has the same help under Help in the bottom bar, with a search box.
A camera won't connect
- On the camera phone, check you tapped Start camera and the code is on screen.
- Put both phones on the same Wi-Fi, then tap Retry.
- Still nothing? Some Wi-Fi stops phones from talking to each other. Choose Over internet on the camera phone, or use a camera link.
- Type the code again: 6 digits for Same Wi-Fi, ABC-123 for Over internet. Expired? Tap New code.
"Already connected to another production": on the camera phone tap Stop camera, then Start camera again. Need to carry on? Skip this camera and add it later.
The stream keeps buffering
- Swipe left for Status and keep Auto quality on.
- Choose a lower quality. On a camera phone with weak Wi-Fi, pick Standard.
- Move closer to the Wi-Fi router, or use mobile data where the signal is strong.
- Stream to fewer platforms at once, and pause downloads and video calls on the same internet.
There is no sound on the stream
- Check the mic is not muted (Mic on the one-phone screen, Mute in the Audio tab).
- Sound follows the Screen on air: Screens → Edit and turn on Commentary mic or Camera sound.
- USB or Bluetooth mic? Connect it first, then choose it as the main microphone.
- On a camera phone, allow the Microphone permission.
Stream-It says LIVE but viewers can't see it on YouTube or Facebook
- Look at the platform card under the top bar. Approve this stream? Tap its button and start the broadcast in YouTube Studio or Facebook.
- YouTube: in YouTube Studio, turn on Auto start for the stream so the next one starts by itself.
- Added with a stream key? Check the key in Streams → Edit is today's key for that channel.
- Give it a minute: platforms often show the live 10–30 seconds after it starts.
YouTube says live streaming is not enabled
YouTube turns on live streaming once per channel, in YouTube, not in Stream-It. Open YouTube Studio, then Create → Go live and follow its steps (it may ask you to verify the channel with a phone number). The first time can take up to 24 hours. Then copy the stream key again and save it in Stream-It.
The score is not updating
- In your scoring app, copy the overlay link for today's match. It starts with https://.
- In Overlays, open the score overlay and tap Paste link.
- Check the overlay is shown (the eye is open) and that the Screen on air has it (Screens → Edit).
Keep scoring in your scoring app; the overlay page updates itself.
Text in an overlay is too small or cut off
Make the text box bigger with its handles (an edge for one side, a corner for both), or set the font size to Auto: the text then fills the box and shrinks to fit. On a small phone, ⤢ Full preview makes the handles easier to grab.
I left the live screen and can't find it
The live is still running. Tap the mini window, or the LIVE card on Home, to go back. On Android you can also tap the Stream-It is live notification.
The app closed during a production
Open Stream-It again: the production comes back in READY (never live by itself) and a recording that was cut off is saved. Tap GO LIVE when you are ready.
Still stuck? Contact us, or use Report a problem in the app's Settings.